
Business Training
Develop the skills needed to build and
grow your Partner.Co business.
Learn the system.
Use the system.
Duplicate the system.
Business Training
General Info
In this section, you will find general info.
Partner.Co Support
Phone:
1-855-462-7449
Email:
(General questions and support)
(Tree Maintinence & Assistance)
Be sure when emailing to include the Names and Brand Partner ID’s you’re working with to avoid confusion!
Mailing Address:
13894 S Bangerter Pkwy
Suite 200
Draper, UT 84020
Operating Hours:
Monday-Friday:
8 a.m. - 6 p.m. MT
Saturday:
8 a.m. - 1 p.m. MT
Do you need a subscription to stay commissions qualified
You don’t need a subscription to stay commission qualified - BUT there are benefits to maximize your pay and product savings with a subscription.
To stay commission qualified every month during your COLOR WEEK, you need 100PV from your personal orders/preferred customer orders to remain qualified for the next 4 weeks.
The simplest way to maintain this is to set up a personal subscription for 100PV minimum during that week.
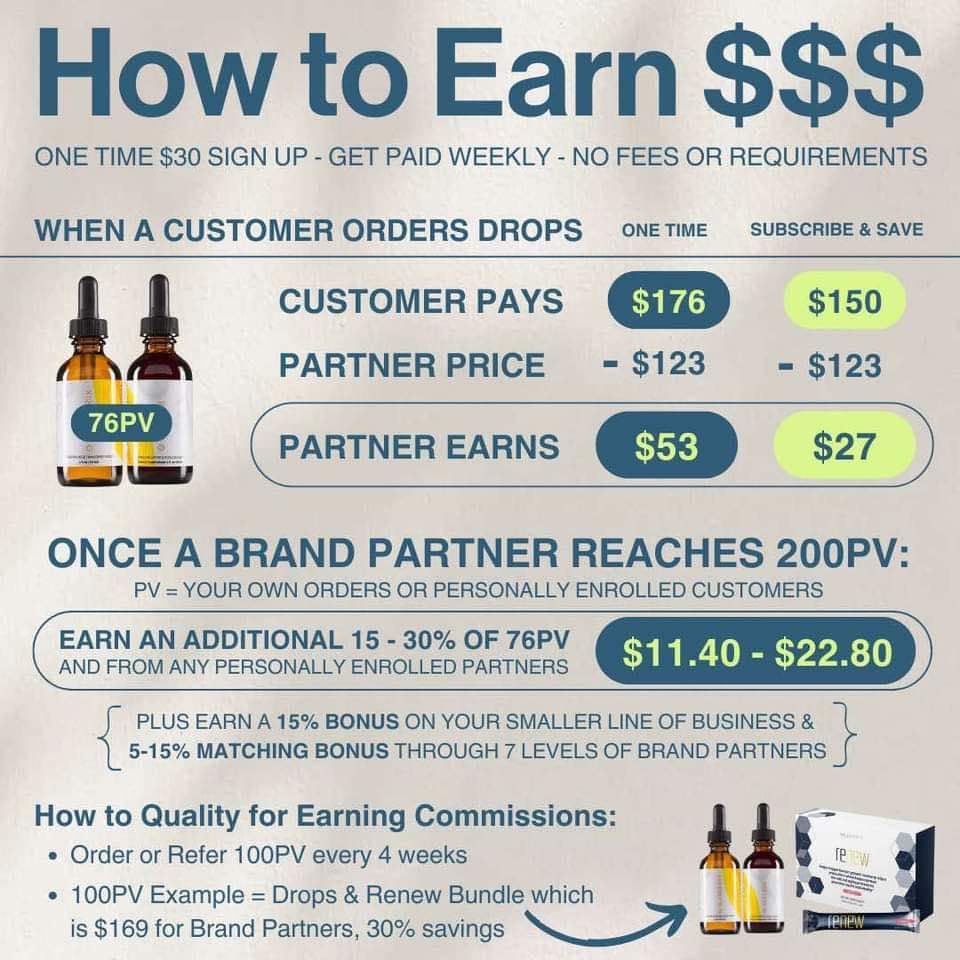
Being on a subscription of ANY PV amount gives you the maximum 30% off wholesale pricing, which also allows you to earn the maximum retail profit.
When you sell the product to a customer, you earn the difference of what they pay vs what you get it for. In an example of selling the drops, if the customer buys for full retail at $176, if you’re on subscription your price is $123
You’d earn the difference ($176-$123 = $53)
If you’re not on subscription your pricing is full retail, so your pricing is $176. Meaning you don’t earn the retail profits.
Note: you can always change/reschedule/cancel the subscription.
Paycheck/Promotion Timing
When do I get my paycheck and promotions?
Example, Week 34 (Sat. Aug 17 - Friday August 23)
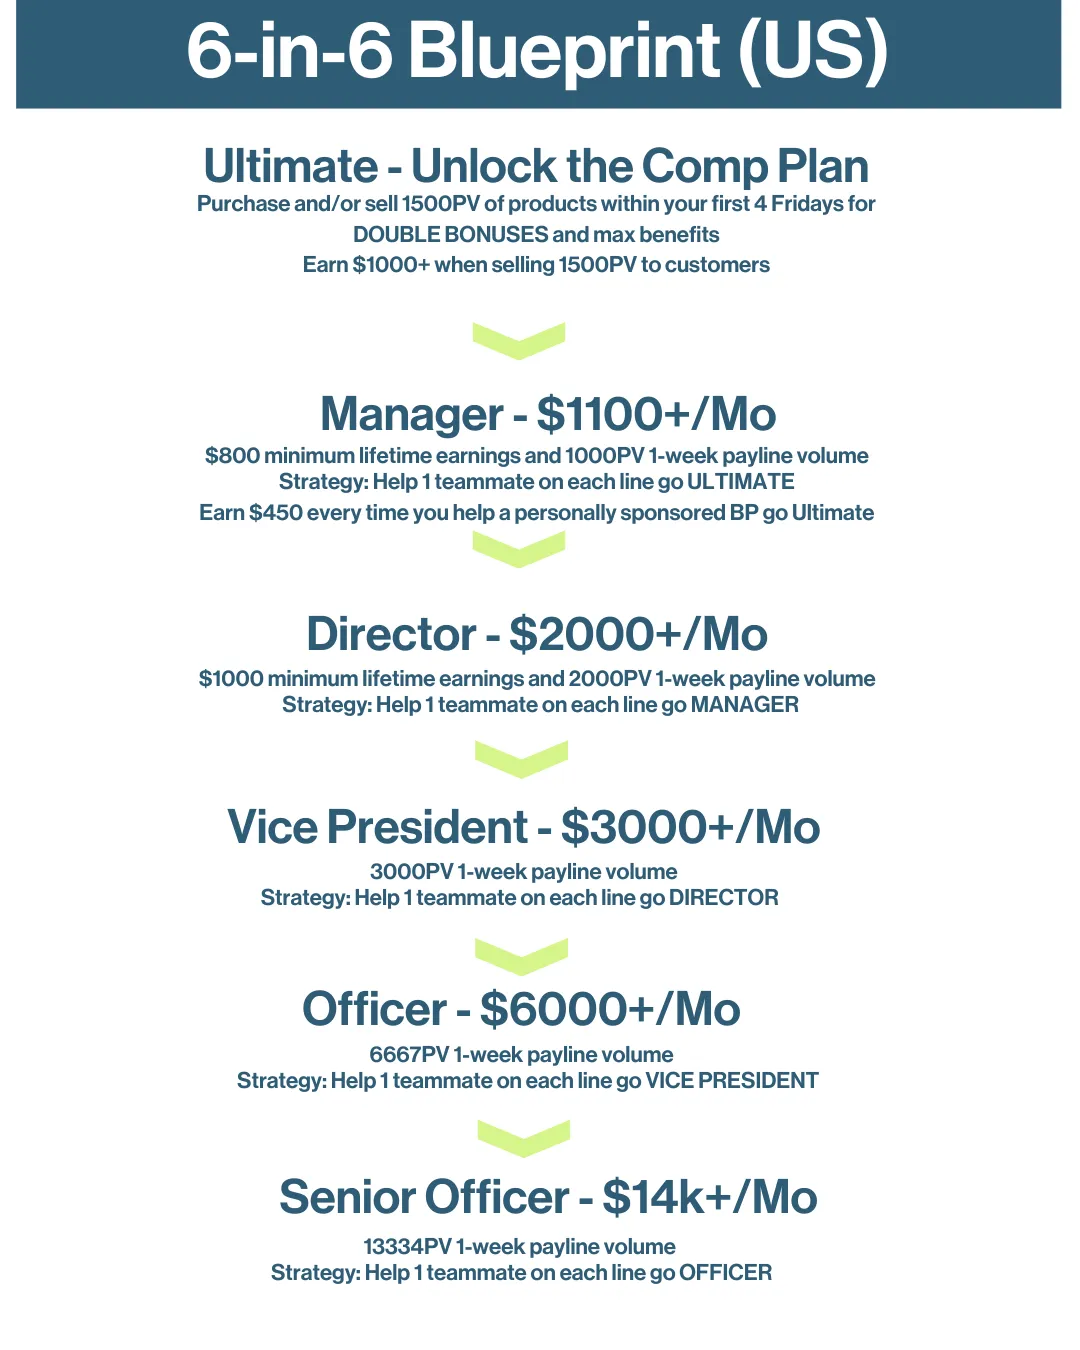
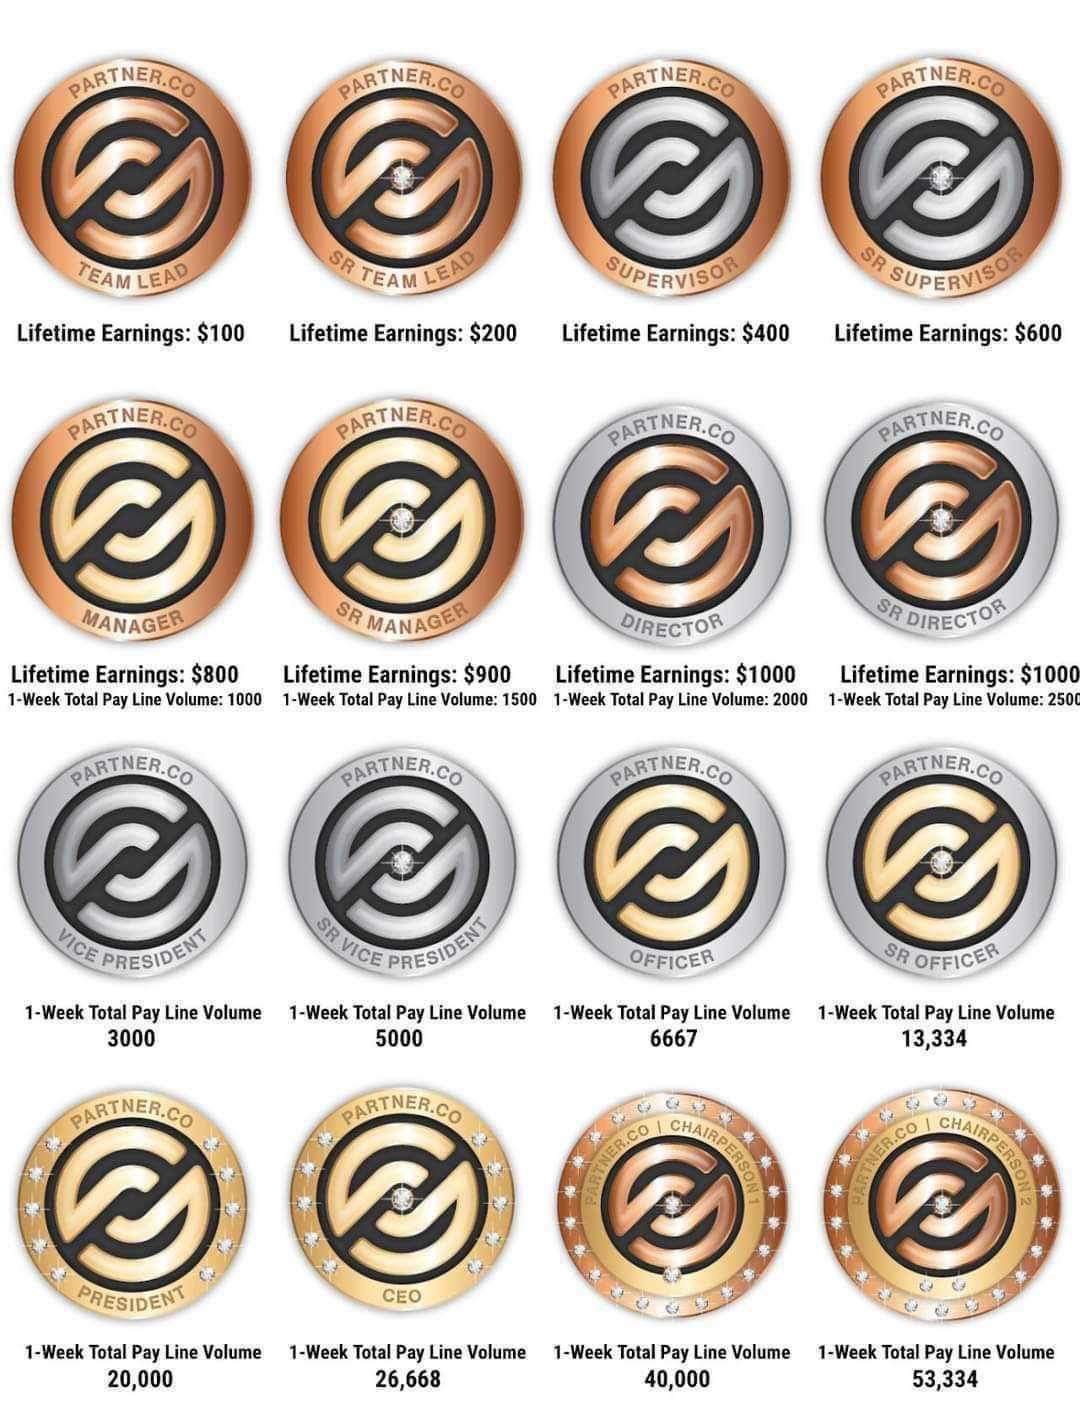
Title advanced to Manager ($800 lifetime earnings and 1-week pay-line volume of 1000 PV) .
- Every commisision week ends Friday MIDNIGHT Mountain Standard Time (August 23) .
- Commissions are calculated the following Tuesday (August 27) .
-New title reflects in the back office and paycheck deposited in bank (if direct deposit was chosen) by the following Friday ( August 31).
-If achievening Ultimate/Gold by hitting Manager, those are manually adjusted by the 2 Monday's following the commission week end (September 2).
Title Advancement Report Instructions
How to check for your team's promotions weekly?
- Commission week closes on Fridays midnight MST
- Title Advancement Report updates the following Friday
- Log into Office (https://officev2.partner.co/account) > Click on the Menu bar > Under "My Reports" > "Downline Title Advancement"
- Select the appropriate "Advancement Period Range" > "Run Report"
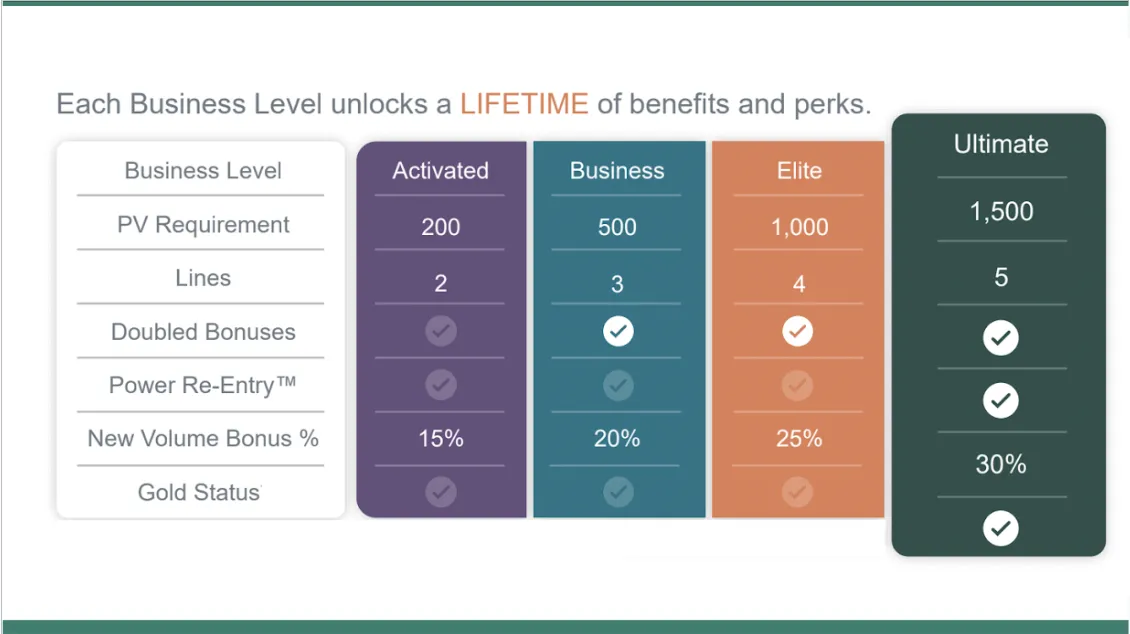
What are New Volume Bonuses? How do business levels impact these bonuses?
New Volume Bonuses are additional earnings on top of your 30% profit margin from retail sales.
These bonuses apply to all new volume sales, which include purchases made by new customers or brand partners within their first 4 weeks.
The amount of your new volume bonus is determined by your business level, which is based on your PV from either personal purchases or customer orders.
Here’s a breakdown of the business levels and the corresponding new volume bonuses:
ACTIVATED (200 PV): 15% bonus
BUSINESS (500 PV): 20% bonus
ELITE (1000 PV): 25% bonus
ULTIMATE (1500 PV): 30% bonus
The higher your business level, the larger the bonus you earn on new volume sales.
Subscribe and Save Comission Qualified
Partner.Co:
Login with your ID # N******* (not your email address)
Go to the office
1. Set up website name: 3 lines on the upper left corner, go down to settings, username edit, and put in the name you want, and save (lowercase)
3 lines upper left click my money, partner.co pay, click green circle with + in it, direct deposit-100% put in details-save. Scroll to the bottom, save, confirm (must save direct deposit 100%, ewallet 0%).
Scroll down to 2nd green circle with a + in it, fill out social in 2 ovals under the social security oval. Save.
Go to the three lines on the left. Dashboard, click subscribe (purple circle with a truck in it) set up subscription 100pv on your proper color week
Remember, you have 4 Fridays to set up your subscribe and save with 100pv minimum (keeps discount, trip points earning, qualified to make money)
Business Training
Brick & Mortar
In this section, you can open the accordion below to explore Brick & Mortar solutions.
Buisness Health & Hormones SlideDeck
How to launch into Brick and Mortar’s
How to Set up an IPad - Brick and Mortar
👀When someone you know shares they’re down 52 lbs… you pay attention! 👀
Joeanne has been excited about the Body Balancing Drops she added into her routine, and watching her stay consistent has been seriously motivating.
Drop “CONTROL” if you want appetite support.

Brick and Mortar Business Owners
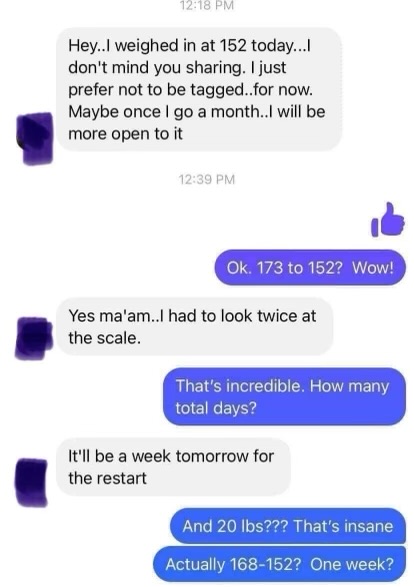
Wow!! 21 lbs down already 🤩
Consistency looks good on her! She’s also been sharing her experience with the Body Balancing Drops lately.
Comment “BOOST” if metabolism matters.👇
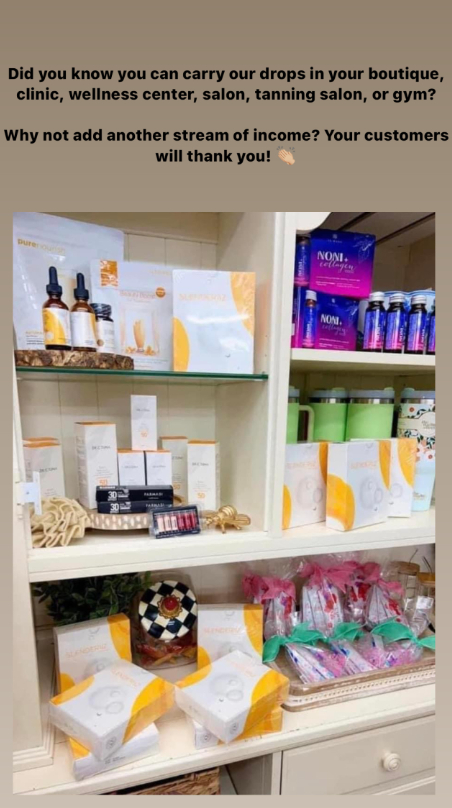
Let’s get Partner.Co in your space!
Did you know you can carry our drops in your boutique, clinic, wellness center, salon, tanning salon, or gym?
Why not add another stream of income? Your customers will thank you!
Business Training
Square How To
In this section, you can open the accordion below to see current team calls.
Step 1: Create Your Square Account
Let’s get your Square account up and running.
1. 🔗 Use the referral link for extra :
OR
🌐 Go directly to:
Then:
2. Sign up using your personal or business email.
3. Choose a name for your business — you can update it later.
For business type, select:
→ Retail Goods
When asked how much you expect to make:
→ “Less than $100K” or “Not sure yet”
4. Click Continue to start your setup.
Step 2: Verify Your Business & Connect Bank
This is where Square learns about you so you can get paid.
1. Select your business type:
- Sole Proprietor (just you, not an LLC)
- LLC (legally registered business)
2. Verify your phone number (you’ll get a text code).
3. Enter your personal information (name, address, etc.).
4. Choose how you want to receive payments:
-Bank with Square (perks like fast payouts)
-Transfer to your own bank
-Same-day transfer (extra fee)
5. Confirm all details, agree to the terms and conditions, and set your 4-digit PIN.
6. Add a debit card or bank account to receive deposits.
Step 3: Add Your First Product
Let’s add your first product (like the drops) so customers can buy it online or in person.
Product Basics
Go to Items & Inventory → Click Create Item.
Item Type: Physical Item
Name: e.g. Slenderiiz (Slenderiix + Xceler8)
Description:
Body Balance Drops — use before meals to support energy, hunger, and hormone balance.
Images: Upload 1–3 product photos.
Price & Stock
Price: e.g. $160.00
Unit Cost: e.g. $123.00 (for tracking profit)
SKU: Optional (helps track items)
Tracking: Turn ON
Add Stock: Enter how many you have (e.g. 4 units).
Optional Settings
Categories: Organize items for your store (optional).
Modifiers: Add-ons (like sizes or colors).
Custom Attributes: Extra details.
Low Stock Alerts: Toggle ON if you want notifications.
Click Save when done.
Step 4: Build Your Online Store
This is where you’ll design the site customers will visit to shop your products.
Go to the Online tab in your Square Dashboard.
Click Select Theme to choose a free website layout.
→ You can customize colors, fonts, and images.
Set up your domain name:
Use a free Square-generated link, or
Upgrade to choose your own .com
Edit your homepage, add your logo, and personalize it however you like.
When you’re ready, hit Publish — but you can always come back and tweak it later.
Step 5: Set Fulfillment
Now tell Square how your customers will receive their orders.
In the store setup flow, go to the Shipping section.
Choose your method:
Flat rate shipping
Carrier-calculated shipping
Local pickup (if relevant)
You can skip subscriptions unless you're offering monthly bundles.
You’re almost live!
Step 6: Accept Payments
Before you start making sales, make sure payments are fully set up.
Go to Settings → Accounts & Settings → Payments
Scroll to Payment Methods and make sure everything looks good.
Be sure Afterpay is active if you want to offer buy-now-pay-later:
If it’s not on, Square will tell you what to fix.
Bonus: Check your Banking tab anytime to see your transfers and payouts.
Help link: https://squareup.com/help/us/en/article/7770-accept-in-person-payments-with-afterpay-and-square
Step 7: Create a Direct Checkout Link (Optional but Powerful)
Want to share your product directly in a text, DM, or story? A checkout link makes it easy.
1. Go to Take a Payment → Create a Link.
2. Choose Sell an Item.
3. Select your newly added product.
4. Save the link and copy it — perfect for sharing anywhere.
Done! You’re ready to sell!
From here, you can:
- Add more products
- Update inventory
- Share your website
- Post your payment link
- Download the Square app for mobile sales
Hepful Information
How to Use the Square App
Let’s get your Square account up and running.
Everything you need to sell on the go!
✔️ Download the app
✔️ Log in with your Square account
✔️ Access your items & take payments
✔️ View orders, inventory, and customer info
Great for pop-ups, vendor events, or mobile checkout.
Pricing Strategy Tips
Tips to help you price for profit without overthinking:
✔️ Know your unit cost (use “Cost Per Item” in Square)
✔️ Price with purpose — round numbers are easiest
✔️ Consider bundle pricing (2 for $$ or full set discount)
✔️ Use Square Reports to track your real profit margin
Start where you're comfortable — you can always raise prices later.
Creating a Bundle or Discount
Want to sell a 2-pack, a full set, or a combo deal?
Use one of these two options:
1. Create a New Item → Set “Sell as a Bundle”
Or
2. Create a variation like:
Slenderiiz Drops
Slenderiiz + AbVantage Bundle
Add photos, descriptions, and set the total price.
It keeps your inventory separate and pricing clean.
Simple Inventory Setup
Track what you have and avoid overselling.
✔️ Turn Inventory Tracking ON under each item
✔️ Add the quantity on hand
✔️ Optional: set a low stock alert
✔️ Update manually when you restock
That’s it! You’ll get reminders when things get low.
No need to overthink it.
Sell In Person (No Card Reader Needed)
Don’t have the little card reader? No problem.
You can still make in-person sales using:
✔️ Manual Card Entry
✔️ QR Checkout (customer scans with their phone)
✔️ Tap to Pay (on phones that support it)
It’s all inside the Square app under “Take a Payment.”
Smart Seller Tips (from Me to You)
Little things I’ve learned while setting up my Square store:
✔️ Test your links before sharing
✔️ You can use stock photos. Just make sure they match what you’re actually selling! Don't use photos of Slenderiiz and AbVantage or a Slenderiiz Listing.
✔️ Simpler = better (don’t overcomplicate categories or bundles at first)
✔️ You can update your item description or photo anytime without breaking your link
Team Strive
PDF's
In this section, you can find business training relevent pdf's.
Business Training
Infographics
In this section, you can view Buisness Training Infographgics.

Business Training
Links
In this section, you will find links to further business training tools and resources.
Partner.Co Resource Library English (US) |
Savings Bonus Training |
New VideoPartnerCo Business -Intro |
The Business of Partnerco on Vimeo |
Jan 2026 | Invite to Ignite - Discover Partner.Co |
Full Compensation Plan PDF | https://drive.google.com/file/d/1bmPUyCJkkS2Dr2x8egh2ssG1pgRY_9rM/view
Business Presentation | https://docs.google.com/presentation/d/1DrKR90cpWPn5gu4gMvrSArS4EcRmAZnOGtKQkSRYIUM/edit?slide=id.g3b9515194bb_0_108#slide=id.g3b9515194bb_0_108
How to Send Discover Partner.Co Calls (Step-by-Step Training) | Kevin Cota Corporate Training | https://www.youtube.com/watch?v=-erlcfBiF3I
Event #1
Who:
What:
When:
Where
Why:
Link:

Event #2
Who:
What:
When:
Where
Why:
Link:
Event #3
Who:
What:
When:
Where
Why:
Link:
Event #4
Who:
What:
When:
Where
Why:
Link:
Event #5
Who:
What:
When:
Where
Why:
Link:
The Empower Training System

The Empower Training System is an independent training resource platform aligned with an official Partner.Co guidelines.
© Copyright 2026. Partner.Co "the WORKS" The Empower System. All Rights Reserved.
Facebook
Youtube